
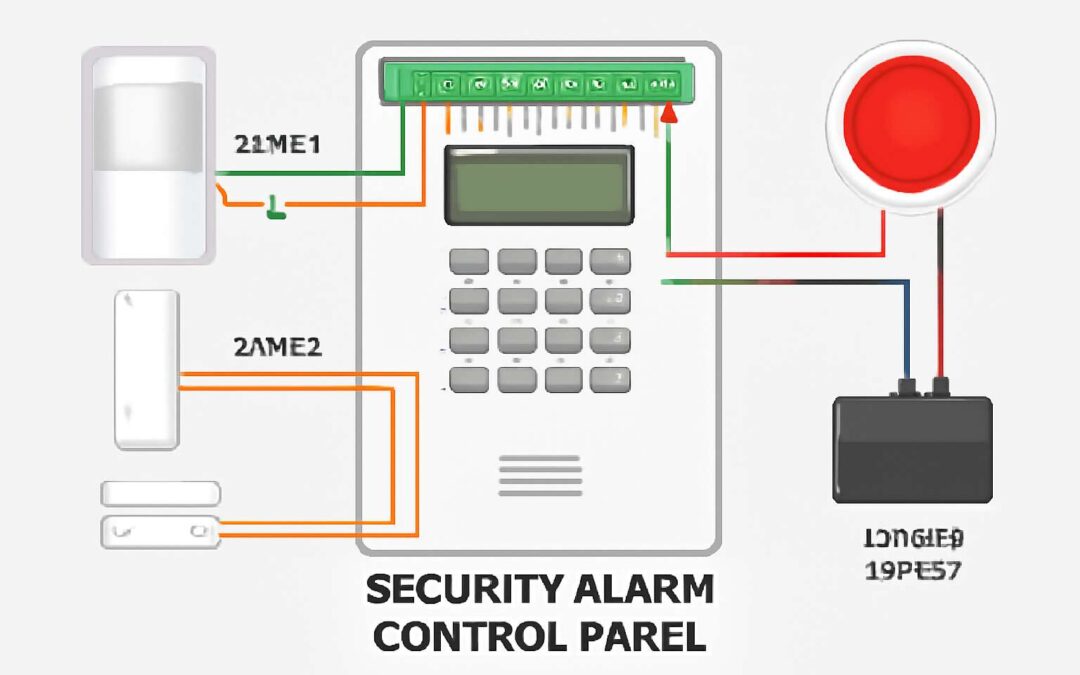
Understanding Security Alarm Systems
Overview of Security Alarm Components – Components involved in a typical security alarm system
In the quiet hush of night, a security alarm system acts as an unseen guardian, whispering reassurance through its intricate dance of components. Understanding the security alarm components is essential to appreciating how these silent sentinels operate. A typical security alarm system comprises sensors, control panels, sirens, and communication modules—each playing a vital role in weaving a fabric of safety. When exploring a security alarm wiring diagram, one uncovers the delicate choreography that connects these elements seamlessly.
At the heart of this system lies the control panel, often regarded as the brain, orchestrating signals from various sensors—door contacts, motion detectors, and glass-break sensors. These sensors detect intrusion, triggering the alarm to sound or alert authorities. The wiring diagram serves as a blueprint, revealing the path of electrical currents that keep the system alive and responsive. An understanding of these components and their connections not only simplifies installation but also ensures the system’s longevity and reliability in safeguarding homes and businesses across South Africa.
Types of Security Alarm Systems – Wired vs wireless alarm systems
Security alarm systems come in a fascinating array of configurations, each tailored to specific needs and environments. The primary distinction lies between wired and wireless alarm systems, each with its own set of advantages and challenges. Wired systems, as the name suggests, rely on physical cables—typically running through walls and ceilings—to connect sensors, control panels, and sirens. These systems are renowned for their robustness and less susceptibility to interference, making them a favored choice for large commercial properties across South Africa.
On the other hand, wireless alarm systems have gained popularity for their flexibility and ease of installation. They operate via radio frequency communication, eliminating the need for extensive wiring. This not only cuts installation time but also allows for easy upgrades and relocations. When exploring a security alarm wiring diagram, understanding these fundamental differences helps in designing systems that are both reliable and scalable. Whether wired or wireless, the key is ensuring that each component seamlessly integrates into the overall security architecture, providing peace of mind in a landscape where safety is paramount.
Importance of Proper Wiring – Ensuring system reliability and safety
In the intricate dance of securing your fortress—be it a cozy Johannesburg home or a sprawling Cape Town estate—the importance of proper wiring cannot be overstated. A security alarm wiring diagram isn’t just a fancy blueprint; it’s the secret sauce that ensures your system doesn’t turn into a modern-day comedy of errors. Imagine installing sensors and control panels only to find they’re more “disconnected” than your Wi-Fi during load shedding. Proper wiring guarantees that every component communicates flawlessly, creating a digital web of safety rather than a tangled mess of faulty connections.
Neglecting this vital step can lead to false alarms, dead zones, or—worse—system failures when you need it most. To avoid this, consider these crucial points:
- Ensuring all sensors are correctly wired to the control panel, avoiding the dreaded “phantom triggers.”
- Using high-quality cables resistant to interference and weather conditions, especially in South Africa’s diverse climate.
- Following a comprehensive security alarm wiring diagram that clearly illustrates connections, preventing costly missteps.
In the end, proper wiring isn’t just about technical accuracy; it’s about peace of mind. When your alarm system is wired correctly, it’s like having an unsleeping guardian—reliable, steadfast, and always on alert. After all, in a landscape where safety is paramount, a well-wired security alarm system is your best line of defense against the unexpected.
Basics of Alarm Wiring Diagrams
What Is a Wiring Diagram? – Definition and purpose of wiring diagrams
A security alarm wiring diagram is the silent architect behind a fortress of safety, transforming raw components into a symphony of protection. It’s more than just lines and symbols; it’s the blueprint that ensures each sensor, siren, and control panel harmonizes flawlessly. When properly understood, a wiring diagram becomes a map of trust, guiding technicians through the intricate dance of electrical pathways with clarity and precision.
Think of it as a magical map that reveals the hidden connections powering your security system. Its purpose is to streamline installation and troubleshooting, ensuring that every alarm component communicates seamlessly. Whether it’s a simple wired alarm or a complex network, a detailed security alarm wiring diagram is essential for durability and safety. By visualizing the entire system, it helps prevent costly mistakes and guarantees the alarm’s unwavering reliability in South Africa’s diverse environment.
Symbols and Notations – Common symbols used in alarm wiring diagrams
At the heart of every reliable security alarm wiring diagram lies a language—a set of symbols and notations that communicate complex connections with clarity and precision. These symbols are not mere abstractions; they are the universal shorthand that transforms tangled wires into a coherent blueprint of safety. Recognizing these symbols unlocks a new level of understanding, turning technical chaos into strategic order.
Common symbols used in security alarm wiring diagrams include simple yet powerful icons that represent sensors, control panels, power supplies, and sirens. For example, a circle with a cross might denote a motion detector, while a zigzag line symbolizes a siren. Understanding these notations allows technicians to interpret even the most intricate wiring diagrams with confidence. It’s akin to deciphering a secret code—each symbol a vital clue in constructing a resilient security system.
When reading a security alarm wiring diagram, you may encounter an unordered list of essential symbols such as:
- Power supply lines
- Detection sensors
- Control panels
- Siren and alarm outputs
Mastery over these symbols ensures the system’s integrity, promotes troubleshooting efficiency, and ultimately fortifies the fortress of safety that every security alarm wiring diagram strives to create. In the end, these symbols are not just technical markings—they are the language of protection, inscribed in every line and connection that speaks to the very essence of vigilance in South Africa’s diverse environment.
Tools Needed for Wiring – Tools required for installing or understanding wiring diagrams
Understanding a security alarm wiring diagram isn’t just about connecting wires; it’s about mastering a craft that safeguards what matters most. To decode this intricate blueprint, having the right tools at hand can make all the difference. Precision, after all, is the foundation of a reliable security system. Without the correct equipment, even the most detailed wiring diagram can turn into a confusing tangle of wires and symbols.
Essential tools for installing or understanding a security alarm wiring diagram include a multimeter, wire strippers, crimping tools, and a screwdriver set. These instruments help ensure clean connections and accurate readings, transforming complex diagrams into actionable steps. For those working in South Africa’s diverse environments, quality tools are vital to withstand the unique challenges of local installations. Remember, a solid understanding of your tools empowers you to interpret wiring diagrams confidently, turning technical complexity into a seamless security solution.
Step-by-Step Guide to Creating a Security Alarm Wiring Diagram
Planning Your System Layout – Mapping out zones and components
Creating a security alarm wiring diagram isn’t just about connecting wires; it’s about orchestrating a symphony of safety that can mean the difference between vulnerability and invincibility. To begin, envision your system layout as a blueprint—each zone, sensor, and control panel mapped with precision. This step ensures that every component functions harmoniously, preventing costly errors down the line. Remember, a well-planned wiring diagram provides clarity, making troubleshooting a breeze and enhancing overall security system reliability.
Next, map out your zones meticulously, considering high-traffic areas and potential entry points. This process involves marking locations for motion detectors, door sensors, and alarm sirens. An organized approach might look like this:
- Identify critical zones requiring coverage
- Designate wiring pathways to avoid interference
- Ensure power supply points are adequately planned
By carefully plotting these details, your security alarm wiring diagram becomes a powerful visual tool—transforming complex wiring into a straightforward, robust security network that’s ready to thwart intruders and safeguard your property with unwavering resolve.
Identifying Power Sources and Backup – Main power and backup batteries
Creating a comprehensive security alarm wiring diagram requires careful attention to power sources and backup systems. In South Africa, where power outages are frequent, ensuring your system has a reliable backup can be a matter of life or death. The main power supply should be connected to a dedicated circuit that can handle the load of all components, from control panels to sirens. Equally important is integrating backup batteries to keep the alarm operational during outages. Without a solid backup, your security system becomes vulnerable whenever the grid fails.
To streamline this process, consider these key steps:
- Identify the main power connection point—usually the main circuit breaker.
- Ensure the backup battery is correctly rated to sustain the system for the desired duration.
- Design wiring pathways that facilitate easy maintenance and prevent interference.
In essence, a well-designed security alarm wiring diagram not only maps out the connections but also guarantees that your security system remains resilient under any circumstances. Proper planning and precise wiring are the backbone of reliable security—especially in regions where power stability is unpredictable.
Connecting Sensors and Detectors – Door/window sensors, motion detectors
Creating an effective security alarm wiring diagram that seamlessly integrates sensors and detectors requires both meticulous planning and an understanding of the system’s core architecture. The process begins with selecting optimal locations for door/window sensors and motion detectors, ensuring they cover blind spots and high-risk entry points.
Once positioned, connecting these components demands a careful approach—wiring should be unobtrusive yet accessible for future maintenance. For each sensor, establish a dedicated circuit that links back to the control panel, respecting the integrity of the overall wiring scheme.
A well-drafted security alarm wiring diagram visually maps these connections, highlighting essential elements such as zones, power supplies, and data pathways. This visual blueprint not only clarifies the installation process but also ensures that every sensor functions optimally—creating a robust, resilient security system that can withstand South Africa’s unpredictable power landscape.
Wiring the Control Panel – Connections to alarm control unit
Creating a seamless connection between the control panel and your security sensors is the heartbeat of a reliable alarm system. The process of wiring the control panel involves meticulous attention to detail—a dance of precision and foresight. As you prepare to connect the alarm control unit, envision each wire as a vital artery, carrying signals that safeguard your home and loved ones.
Begin by ensuring the power supply is stable and accessible. Next, trace the wiring pathways that will connect your control panel to each zone, whether it’s a door sensor or a motion detector. Respect the integrity of your security alarm wiring diagram by clearly marking each connection point, minimizing future troubleshooting headaches.
- Identify the zones you’ve mapped out during planning.
- Connect the power supply to the control panel, ensuring backup batteries are in place for resilience.
- Wire each sensor’s zone terminal back to the central control unit, maintaining a tidy and unobtrusive layout.
This careful orchestration of connections not only guarantees system reliability but also fortifies your security infrastructure against South Africa’s unpredictable power landscape. Every wire in your security alarm wiring diagram is a testament to your commitment to safety, transforming technical precision into peace of mind.
Integrating Sirens and Notification Devices – Wiring sirens, strobe lights, and communication modules
Creating a comprehensive security alarm wiring diagram that integrates sirens, strobe lights, and communication modules can feel like deciphering a secret code—one that holds the key to your safety. To seamlessly wire sirens and notification devices, start by plotting their placement within your system layout. This ensures each component is optimally positioned for maximum alert visibility and audibility.
Next, connect the siren wiring to the designated zones on your alarm control unit, ensuring polarity and grounding are accurate to avoid false alarms or system failure. For strobe lights and communication modules, follow the wiring diagram meticulously, respecting the symbols and notations used to prevent confusion. A well-drawn security alarm wiring diagram acts as your blueprint, guiding you through connections that might otherwise seem complex or intimidating.
- Identify the power source for each device, ensuring they share a reliable connection with the control panel.
- Wire the sirens and notification devices to their respective zones, maintaining tidy, concealed wiring to prevent tampering or accidental disconnection.
- Double-check all connections against your security alarm wiring diagram—precision here is your best defense against system malfunction or sabotage.
By meticulously integrating these devices into your wiring diagram, you craft a fortress that speaks loudly and clearly—alerting you instantly when danger lurks, even in South Africa’s unpredictable power landscape. Every connection becomes an unbreakable link in your security chain, transforming technical wiring into an unyielding shield of safety.

Common Wiring Configurations and Schematics
Hardwired System Diagrams – Sample wiring diagrams for wired systems
In the intricate dance of safeguarding your sanctuary, understanding the common wiring configurations and schematics of security alarm wiring diagrams becomes essential. Imagine a blueprint not just as a technical map but as a tapestry woven with signals and connections that breathe life into your security system. Hardwired system diagrams reveal a symphony of circuits, where each wire is a thread connecting sensors, control panels, and notification devices in harmonious unity.
For those embarking on the journey of security installation, sample wiring diagrams for wired systems serve as invaluable guides. They illustrate how to connect sensors—like door/window contacts and motion detectors—directly to the control panel with clarity and precision. By following these schematics, you can ensure a robust and reliable security alarm wiring diagram, reducing the risk of false alarms and system failure. Whether you’re customizing your layout or troubleshooting, mastering these schematics transforms complex wiring into an elegant, manageable craft.
In essence, a well-crafted security alarm wiring diagram is the cornerstone of a resilient security system. It transforms abstract components into a cohesive whole, empowering users to design, install, and maintain their alarms with confidence and clarity. This meticulous mapping is not just technical—it’s an art form that safeguards what matters most, all woven into the silent language of wires and signals.
Wireless System Considerations – Integration with wired components
In the delicate architecture of security, understanding common wiring configurations and schematics elevates a simple alarm system into a fortress of assurance. The security alarm wiring diagram acts as a masterstroke—an elegant blueprint that unites sensors, control panels, and notification devices in a harmonious ballet of signals and connections. Whether it’s the precise routing of sensors or the integration of sirens, every detail within the wiring diagram contributes to the resilience of your security infrastructure.
Wireless system considerations add a layer of complexity that demands careful thought. While wireless alarms offer flexibility, their integration with wired components can create a hybrid system that maximizes coverage and reliability. For example, connecting wireless motion detectors to a wired control panel requires an understanding of signal transmission and potential interference. Ensuring seamless interaction between these components is crucial for a robust security alarm wiring diagram.

To facilitate this integration, consider the following:
- Placement of wireless sensors to minimize dead zones
- Ensuring compatibility between wireless signals and wired control units
- Using repeaters or signal extenders to bolster communication
Such considerations underscore the importance of mastering the intricacies within your security alarm wiring diagram, allowing for a system that’s both adaptable and steadfast—an essential trait for safeguarding your sanctuary in South Africa or beyond.
Zone Wiring Patterns – Wiring zones for multiple sensors
In the labyrinth of security infrastructure, the configuration of wiring zones for multiple sensors is akin to orchestrating a symphony—each element must harmonize flawlessly to ensure unwavering vigilance. A well-crafted security alarm wiring diagram reveals these zones with precision, delineating pathways for sensors that guard every vulnerable portal and secluded corner. From door sensors to motion detectors, each component is allocated a dedicated zone, preventing false alarms while maximizing coverage.
Understanding common wiring configurations and schematics enables installers and homeowners alike to visualize the intricate web of connections. For instance, zone wiring patterns can be arranged in series or parallel, depending on desired sensitivity and redundancy.
- Series wiring simplifies troubleshooting but may compromise sensitivity.
- Parallel wiring enhances detection but demands meticulous planning to avoid signal interference.
Such schematics serve as a blueprint—an essential guide in assembling a resilient security system that withstands the chaos of intrusion attempts.
In South Africa’s dynamic security landscape, the importance of mastering these wiring patterns cannot be overstated. A robust security alarm wiring diagram is not merely a technical document; it is the backbone of peace of mind, ensuring every sensor communicates seamlessly within an interconnected network of safety. When zones are correctly wired, and schematics are meticulously followed, the result is an integrated system that responds swiftly, reliably, and intuitively—an unwavering sentinel in the shadows of uncertainty.
Power and Ground Wiring – Proper grounding and power distribution
Proper power and ground wiring are the backbone of any reliable security alarm wiring diagram. Without a solid foundation, sensors and control panels cannot communicate effectively, risking false alarms or system failure. Ensuring that each component has a dedicated power source and a proper ground connection reduces interference and enhances system stability. In South Africa’s unpredictable power environment, this is especially vital.
Typically, the wiring begins at the main power supply, with backup batteries providing resilience during outages. A well-organized wiring schematic will often include a power distribution plan, clearly marking the connection points for sensors, sirens, and control units. For added clarity, some installations utilize:
- Color-coded wiring for easy troubleshooting
- Separate circuits for sensors and notification devices
- Grounding points that minimize electrical noise
In a comprehensive security alarm wiring diagram, power and ground wiring are depicted as the arteries of the system—ensuring every sensor and device functions seamlessly within the interconnected network. This meticulous planning prevents potential electrical faults and guarantees that the alarm system responds promptly when needed.
Best Practices for Security Alarm Wiring
Safety Precautions – Electrical safety tips during installation
Safety should never be an afterthought when installing a security alarm wiring diagram. Electrical safety precautions are crucial to prevent accidents and ensure system reliability. Before beginning, always switch off the main power supply and verify that no voltage is present in the wiring. Using insulated tools and wearing protective gear can significantly reduce the risk of electrical shocks.
It’s also wise to double-check your wiring connections—poor connections can lead to false alarms or system failure. Proper grounding is essential for safety and system performance; ensure all components are correctly grounded to avoid electrical faults. When working with a security alarm wiring diagram, adhering to local electrical codes and standards is non-negotiable.
Remember, if you’re unsure about any aspect of the wiring process, consulting a professional is the safest course of action. Electrical safety isn’t just about compliance; it’s about protecting yourself, your property, and your peace of mind.
Maintaining Signal Integrity – Tips to prevent interference and noise
In the shadowed corridors of security, where unseen threats lurk in the periphery, maintaining signal integrity becomes an art as much as a science. A well-crafted security alarm wiring diagram is the backbone of this unseen fortress, ensuring the whispers of sensors and detectors don’t succumb to noise or interference. To preserve the purity of signals, it is vital to shield wiring from electromagnetic interference, which can distort alerts and create chaos in the system.
Proper routing is paramount; keep alarm wiring away from high-voltage lines or sources of electromagnetic disturbance. Using twisted pair cables can significantly reduce noise pickup, creating a harmonious flow of information. Additionally, grounding all components correctly acts as a silent guardian—discharging unwanted electrical currents that could compromise the system’s reliability.
For those seeking to fortify their alarm system, consider these best practices:
- Separate power and data cables
- Minimize cable runs near appliances or wiring that generate interference
- Use shielded cables where noise is prevalent
Adopting these strategies ensures your security alarm wiring diagram remains a vigilant sentinel against chaos and disruption.
Documentation and Labeling – Keeping wiring diagrams clear and accurate
In the intricate dance of safeguarding a property, clarity in your security alarm wiring diagram is the silent conductor guiding every connection. Precision in documentation transforms a tangled web of wires into a symphony of order, ensuring each sensor, siren, and control panel communicates flawlessly. Clear labeling is the cornerstone—think of it as leaving breadcrumbs for future inspections or troubleshooting, preventing chaos from chaos itself.
To elevate your wiring diagram to a masterpiece of clarity, consider adopting a standardized system of symbols and notations. This visual language acts as a universal translator, making complex setups comprehensible at a glance. An organized diagram not only simplifies installation but also fortifies maintenance routines, saving precious time and reducing errors in the field.
- Use consistent color coding for different wiring functions
- Label every wire with its purpose and connected component
- Maintain a legend or key for symbols used throughout the diagram
By weaving these best practices into your security alarm wiring diagram, you craft a visual blueprint that’s both elegant and functional—an essential tool for professionals and enthusiasts alike. Ensuring accuracy and clarity in your wiring documentation is the foundation of a resilient security system, ready to stand guard against unforeseen disruptions.
Testing and Troubleshooting – Ways to verify wiring correctness and system function
Ensuring your security alarm wiring diagram is accurate isn’t just about neatness — it’s a vital safeguard for your property’s safety. Testing and troubleshooting are essential steps that help verify wiring correctness and system functionality, especially in rural areas where reliable security can mean the difference between peace of mind and vulnerability. A meticulous approach can prevent costly errors and future headaches.
One effective method is to systematically check each connection against the wiring diagram, making sure sensors, sirens, and control panels communicate seamlessly. Use a multimeter to verify power continuity and signal integrity, ensuring no wires are loose or damaged. Incorporating a step-by-step testing process, such as:
- Powering up the system
- Testing individual zones and sensors
- Confirming alarm triggers and notifications
can reveal weak points early. Remember, a well-organized wiring diagram simplifies troubleshooting by providing a clear map of the system, enabling technicians to swiftly identify issues. Regular testing not only confirms wiring correctness but also guarantees your security alarm system remains resilient against unpredictable disruptions, especially in remote settings where reliability is paramount.
Legal and Compliance Considerations
Electrical Codes and Standards – Local and national wiring regulations
When it comes to installing a security alarm wiring diagram, understanding the legal and compliance landscape is as vital as knowing your way around a screwdriver. South Africa’s electrical codes and standards are no joke; they’re designed to keep both your property and your sanity intact. Ignoring local wiring regulations can turn a simple setup into a legal nightmare, complete with hefty fines and failed inspections. It’s crucial to align your wiring practices with national standards, ensuring every connection is safe, reliable, and compliant.
To navigate this maze, consider these key points:
- Verify that your wiring adheres to the South African National Standards (SANS 10142), which dictate proper electrical installation procedures.
- Ensure all components are rated for outdoor or indoor use, depending on their location, to prevent hazards or system failures.
- Document your security alarm wiring diagram meticulously, as it’s a legal requirement and essential for troubleshooting or future upgrades.
Adhering to electrical codes not only prevents costly rework but also guarantees that your security system operates flawlessly, safeguarding your premises with peace of mind. Remember, cutting corners on compliance is a shortcut to disaster—preferably averted with proper wiring and adherence to standards. After all, a secure home is a well-wired home—legally and safely wired!
Permits and Inspections – Requirements for compliant installations
In South Africa, a security alarm wiring diagram isn’t just a doodle on a napkin; it’s a legal lifeline that ensures your alarm system meets strict compliance standards. Skipping the permit process or ignoring inspection requirements can turn a straightforward installation into a bureaucratic nightmare—think fines, delays, and the hassle of redoing work that was supposed to be done once and done right. It’s a bit like trying to fly without a license; impressive until you get caught!
Most local authorities demand that your security alarm wiring diagram be submitted for approval before energizing the system. They want proof that every wire, sensor, and siren complies with South Africa’s electrical standards. Typically, this involves an inspection, during which officials verify that your wiring adheres to SANS 10142 regulations and that all components are rated for their specific environments. Failing to secure these permits can invalidate your warranty and, worse, put your property at risk.
To stay on the right side of the law, consider these key points:

- Obtain all necessary permits before starting the installation.
- Ensure your wiring undergoes inspection and approval by qualified electrical inspectors.
- Maintain comprehensive documentation of your security alarm wiring diagram—this isn’t just for compliance but also for troubleshooting future hiccups.
In the realm of security alarm wiring, compliance isn’t a mere formality; it’s the backbone of a reliable, safe, and legally sound system. Remember, even the most sophisticated security system is moot if it doesn’t meet local legal requirements. Proper permits and inspections safeguard your investment and peace of mind—think of them as the secret ingredients that turn a good system into a great, compliant masterpiece.
System Certification – Ensuring system meets security standards
In the intricate dance of securing a property, the integrity of your security alarm wiring diagram is paramount. It’s not merely about connecting wires; it’s about aligning every component with unwavering precision to meet South Africa’s rigorous security standards. System certification isn’t just a box to tick—it’s the moral backbone that ensures your alarm system truly protects and endures. When a system is properly certified, it signifies adherence to national wiring regulations and guarantees that the security alarm wiring diagram is both reliable and safe.
Without this certification, even the most sophisticated alarm system risks becoming a fragile illusion. The process involves rigorous inspection by qualified electrical inspectors, who verify that every wire, sensor, and control panel uphold the standards set forth by local authorities. This scrutiny isn’t optional—it’s an essential safeguard against future liabilities. Ensuring your system’s compliance through proper certification is, in essence, an act of moral responsibility to protect not just your property but those within it.
In South Africa, the importance of system certification extends beyond legal compliance. It serves as a testament to your commitment to safety, reliability, and integrity. The process of securing the necessary permits and inspections transforms a simple wiring diagram into a legally sound blueprint—an assurance that your security alarm system will perform when it matters most. Because in the end, a well-certified system isn’t just about peace of mind; it’s about standing firm against the chaos of uncertainty with unwavering confidence.
